Thursday 29 November 2007

Blu-Tak...

...Its rubbish to check valve-piston clearances! Too sticky, and just adheres to the valves.

Try again with plasticene, Andy! You've learned from that mistake.

What a pain! Although, on the plus side, the valves didn't hit the piston...

andy

Wednesday 28 November 2007

Crankcase Studs...

They,re not long enough, see??

The one on the right of this pic, on the clutch side is ok (the stud is 5mm longer), and it uses a yamaha flat washer underneath.


However, you have to lift the barrel slightly to get the nut on, as its close to the 1st (full) fin on the barrel.


The left hand stud is a shorter version of the same. This is the SRX part number for the stud in that position. Maybe different as this head and barrel is actually XT600?


However, its too short: the threaded portion of the stud doesn't go all the way through the nut. A bad thing, so I'll have to use a longer one here too, as per the right hand one in this photo above.


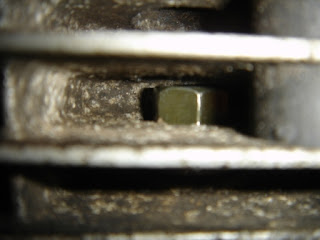
However, on the other side (alternator side of the lump), Yamaha SRX part number suggests a thicker spacer rather than a washer. It also reckons the longer studs are the way to go. Again, possibly different on the XT (originally 595cc) motor...


You can see the thick spacer/washer here, and that even the long stud in this case is too short. 2 custom studs possibly?

Previously, this motor broke the barrel and sheared the studs, possibly due to a distinctly dodgy-looking 4-ply barrel gasket.


I don't want to take any unnecessary chances, but I suppose thats the problem mating together parts which weren't originally intended to go together.

Cheers for now, will post more after I've done a bit more thinking!

andy

Tuesday 27 November 2007

Funny looking MZ!


So I managed to guddle the cam-chain back onto the lower sprocket, got the barrel on, head, cam and rockerbox.

After lots of advice from learned men in The Thumper Club, I've now squished some blu-tak on the valve pockets to check the clearances. I'm hoping they should be fine on a flat-topped piston...

Annoyingly I couldn't reuse the old head gasket or barrel gasket I had, so the scotsman has had to sacrifice new ones. He's not happy about that, because they'll have to be replaced.

Next is to get the cam-chain tensioner on, speak to Martin or Roy at Slipstream about valve clearances, set 'em, and gently turn the motor over a couple of times...

Then strip it down again!
I may also transfer back into the Solar Shed (political move).
And then, I think we'll maybe try KEDO in Germany for some parts. They were kind enough to offer some sponsorship in the shape of discounted parts; hopefully it wont be countered by the cost of postage from Germany. I've downloaded their catalogue, time to brush up on the schoolboy german!

I've also noticed a few problems-
The crankcase studs aren't long enough- I may have to get some custom ones made up
The inner and outer valve springs actually touch
The cam runs very close to the rockerbox
I need a spring retaining hook welded on to the exhaust retainer
Bedtime again!
andy

Monday 26 November 2007

Lord Of The (piston) Rings

A little progress has been made on the motor. When buying a motor in big lumps, why oh why, do you convince yourself that its just a case of bolting it all together?!

I had conveniently overlooked the fact that valve-to-piston clearances and squish clearances would have to be checked, and then the motor taken down and built properly...


So this weekend I've been replacing the studs which had sheared on the old barrel (102mm; 690cc). I've carefully gapped the rings to the recommended clearance, and got the piston on and into the bore.

Can you believe this took 2 days??! My God, at this rate, we're not going to be running by February...

On the plus side, I did receive a special dispensation to work on the motor in the house, thus breaking:


Co-habiting rule 1.1
No motorbike bits in the house"


However, rather than cover myself in glory, I covered the carpet in oil. I managed to rescue it, but I'd rather not have had do. Dust sheets are now down, and I've cleared it so that the annexe to the Solar Shed takes up only half the dining table. Can't say fairer than that, can we?

I've been reading lots of tuning theory, and recommend A Graham Bell's "Performance Tuning in Theory and Practice".
I tried to impress she-of-the-soiled-carpet with this fabulous still-life. It didn't work! And yes, the flowers were a direct result of "Carpet-gate"
I've also noticed that the cam chain has come off the sprocket on the crankshaft. So I think tonight will be spent guddling about in the cam chain tunnel with a coathanger to try to persuade it back over the teeth. I'm trying to avoid taking the rotor off, but maybe its not such a bad idea... And thanks for all the advice I've received from the single-cylinder afficionados in The Thumper Club. Top blokes, who've played this game before. Cheers for now,
andy

Saturday 17 November 2007

Christmas come early

As promised Andy duly arrived at my house on Friday bearing gifts. I was as excited as a very excited thing as we shifted all the parts and boxes into the garage. Below are pictures of the filling of the vacant garage space:

BEFORE


AFTER


So now, on top of the already impressive list of stuff, we have :- two sets of wheels (slicks and wets, with discs), a full exhaust system (with cut-down Hyabusa cans), spare discs for front and rear brakes, a lovely pair of rear-sets, spare brake calipers, complete set of body work (including dummy tank its actual alloy petrol tank), a lovely but unusable alloy petrol tank (the green one above soon on eBay), a selection of sprockets, a broken White Power rear shock and tons of other odds-and-ends. All-in-all a pretty fantastic amount of stuff, and a real treasure trove of racing booty!

Andy and I also had a long chat about the project, and although we thought we were making very good progress, we fully realised that time was not on our side. There was just so much to do before the February deadline. With that in mind I started straight away by taking our box of shocks, two salvageable KR1S's and the badly broken WP, to Racing Line in Derby for a service and set-up. I was pleasantly surprised by their enthusiasm for what we were doing and the fact that they gave very sound advice. The first bit being "Don't bother with the WP unit, as we're scared to even contact them let alone wait for the price!", and secondly that there they could make a pretty good shock from the KR1S bits. It will take a few weeks to get it back but will definitely be worth it, and all for seventy five pounds!

Won't get much done tonight as I'm off to see Bill Bailey in concert at the Nottingham Arena, but promise to roll my sleeves up tomorrow and crack on!

Boyd


Thursday 15 November 2007

Calm before the storm!

Awaiting Andy's arrival tomorrow. Not sure if my modest garage will be big enough for the 'tidal wave' of parts that is about desend on me. On the plus side I will now be able to get on with nearly everything that has come to a halt; with hopefully all the parts I need to complete the suspension and brakes being included.

I am especially keen to get on with having the rear shock re-built in order that I can re-assemble the rear linkage. This will mean taking a varied selection of dampers and springs to Racing Lines (Derby) and seeing if they can make a 'goodun' from them. They quote £75 for a re-build on their web site and I will try to extract as much as I can for the money. Obviously they may say that they are all c**p and that we should consider a new one, but don't think the budget can stretch that far. Once this is done I can then start puttin the whole rolling chassis back together, including the re-burbished brakes.

We have been blessed with an assortment of wheels and tyres, and it will be very interesting to see if Andy gets on with the slicks we will probably run at some point. Before we have the winfall from Ash we were intending to only use intermediates as it meant we were relatively set for both dry and wet conditions. Now that we have the possibility of slicks its a whole new ball game needing tyre warmers and a generator. More expense...........

Anyway after this weekend things should progress fairly quickly and I would hope to have it 'rolling' within three to four weeks. This is obviously dependent upon turn around times by suppliers, my motivation during the cold nights and how much of the rapidly vanishing budget is needed for unplanned outlay.

Will post a few images next time!

Boyd

Monday 12 November 2007

Head-Ache!

I've taken a bit of advice from Roy at Slipstream.

Clearance on the cam lobes to the inside of the rockerbox is really tight.


I measured it in the region of around 2 thou, maybe less. He reckoned 10 thou minimum to avoid scraping oil off the lobe. So thats a bit of "nibbling" with the Dremel to do.


I don't suppose you can really see too much in these lo res pictures, but I'm on dial-up, so you'll just have to imagine that they're decent!

Below you can see where its been relieved already, but I suppose there is a bit more to take off. I think the wall is pretty thick, so its not going to do too much harm.


It does mean stripping the head though, something I initially wasn't going to do! Lazy old Duncan?

And then an initial build with an old head gasket to check piston to valve clearances. Oh well, there goes my idea of "build once"!

For info, he reckons Yamabond gasket cement on the barrel and rockerbox, nothing on the head. As for the copper washers under the head-bolts some Yam heads had 'em some didn't.
Mine is a 2KF (Yamaha XT600) head and barrel.
No Loctite anywhere, and torque to factory specs. So I'll phone again once he's had a chance to check about the copper washers. Good bloke is Roy! I think him and Martin be getting a few stupid questions before this engine is up and running....

Andy

Sunday 11 November 2007

Think twice, Build once...

Not lots of progress this weekend. Namely because this isn't an entirely straightforward build, and I don't want to have to take it down again if I don't have to.

So, I've cleaned it all up, got the gasket surfaces spotless, found the new gaskets, studs, nuts and headbolts and done a little thinking.

First off is to put the new studs in. Loctite?? What torque? And do we use Yamabond on the base gasket?

I have new studs for the head. Should I use new copper washers?

And the cam lobe seems mighty close to the rockerbox. How close can it be?

I think I'll have to get on the blower and bug Martin Sweet at Slipstream. He's always been really helpful in the past, having played this game before.

"Hi Martin, please help me I'm a buffoon....."

I'll let you know what he reckons!

andy

Sunday 4 November 2007

The Big Bang Motor

Well, with the 2007 bike now effectively sold, I'd best get on with building the prototype motor. we'll have to mate it with the chassis around February, so time is becoming of the essence!
Here are a few piccies from the Team Thumper Solar Workshop (yes, it's totally self-sufficient, unlike our race Team!).

The Yamaha XTZ bottom end was originally water cooled, with a starter motor. Here you can see where the starter boss has been cut off and welded up.
On the other side, you can see the beautifully machined blanking plate where the water pump used to live. Going aircooled makes for a simpler build, and should mean that the engine doesn't "cook" as badly on the grid. It will also be lighter, and without the additional expense of a radiator. The latter is also an easily wrecked item, in event of the inevitable spills!


And here's the newly honed barrel, for the brand spankers 100mm (640cc) piston.


There's a bit of work with WD40 and a toothbrush there I think! Its an XT item I think, as is the head:

If you look closely you can see the spring clip retainers to hold the header pipes on, so we dont have to use the original Yamaha retainers, and makes it nice n easy to get the pipes on and off. However, I noticed today that the right hand one in the photo above has got one of the clips broken off. There's another job for Mr B! It came with stainless valves and springs, and a Yoshimura Stage 4 cam...

Looks happy, doesn't he? And so he should with such fetching headgear!


The motor came with a beautiful Carillo rod, and the crankcase mouth has been machined to accept a 690 104 piston. Thats on it just now, but I think its probably a bit much and may compromise reliability.

Size matters, apparently:


So the first job is to locate a new base gasket, get the 640 piston on and slot it into the bore. I'll let you know when its done and then get started on the head. I have to get a bit of advice on that, from some learned men, but in the meantime I can clean up mating surfaces etc, and think about what method I'm going to use to tie the barrel down. I'll be seeking advice on what barrel and head I actually have, and how best to go about things.

Cheers for now, Andy

Thursday 1 November 2007

Faster Pussycat!

I just got some pictures of the last weeekend at Cawell Park from PLJ Photo. I'll put more up soon, but I like this:

I was leading Dave Bennet (#54), and this was just coming onto the start finish straight on a slight downhill. I knew he was there, though he hadn't passed me through Hall bends or the hairpin. The throttle was right on the stop, and I was really giving it the berries up through the gears. I remember wishing for more power, and urging the little SRX to get a move on! His faster machine did get me by the end of the straight, though! Thanks for a great race Dave!